Summer is finally here and that’s great news for those of us who enjoy spending time in the great outdoors! Whether you prefer sports or leisure activities – or ambitious for do-it-yourself projects – here’s hoping the days unfold just the way you wish.
Some of the best “work” days are spent getting together with teammates for fun, food, refreshments, and relaxing conversation. If your discussions turn to leak testing, I sincerely hope you will refer LeakMaster to your counterparts for general inquiries or any specific questions they may have. We appreciate it when you let others know that we are available to assist them as we would assist you.
Common seal tooling mistakes.
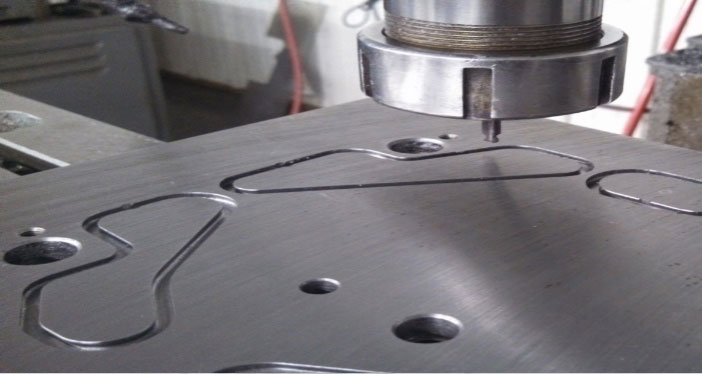
Delivering any type of quality inspection equipment demands consistency and repeatability. With leak testing machinery, the seal tooling design is just as vital as the proper instrument selection.
Here are some of the most common mistakes:
- Seal movement – Seal movement (also known as seal creep) while testing creates volume and pressure changes within the part, which causes the tester to display inconsistent leak rate measurements. A rod lock cylinder, landing on a positive stop or collapsing a seal until a “metal-to-metal” condition is created are considered to be the best scenarios for consistent results.
- Seal Durometer and Material – Wrong seal material selection or too soft of a durometer can cause inconsistency of test results and poor seal life. The correct seal should have ample compliance while retaining over all rigidity and be rated for the part temperature as tested. Any sharp edges must be avoided.
- Undersized machine – An undersized machine base or clamping mechanism will deflect when the part is pressurized causing erratic leak test measurements. LeakMaster recommends a deflection analysis during the design phase to help pinpoint any deflection issues prior to manufacture.
- Poor part design – Without an understanding of the mechanics or physics behind leak testing, a product may be designed in a way that limits how it can be sealed and tested appropriately. Bores must be large enough to deliver sufficient air supply to maintain expected cycle times. Surfaces must be finished to a proper tolerance to allow consistent sealing during production leak testing.
Well-designed seal tooling is “the core” of a consistent leak testing machine. Operator and process confidence hinges on being able to properly seal the part and maintain seal life. LeakMaster will gladly guide you through proper sealing techniques on your future leak testing projects to ensure the highest level of success.
How a Gage Capability Study helps you.
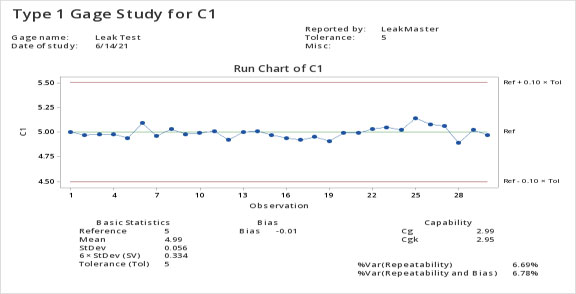
Whether you are setting up a new leak testing application or inheriting an existing one – a capability study can help.
A Capability Study validates the leak tester setup is correct & optimized to provide the fastest cycle time possible.
The study is performed utilizing a Master (non-leaking) part, calibrated leak orifice (manufactured to the reject limit) and statistical tools, such as Minitab or our Leak-Cal chart.
- Seal-off Master part and verify the part and seals do not leak once pressurized, repair any leaks found until leak free.
- Calibrate leak tester with Master part & calibrated leak using conservative timers.
- Once calibrated, re-test to ensure the tester is repeatable with timers & limits established.
- Perform a Type 1 Gage Capability Study (typically a 30-piece test run on a Master part with the calibrated leak introduced into each cycle, with a predefined delay between each test to allow the part to relax between cycles).
- Input leak rate results into Minitab or Leak-Cal chart.
- Shorten or lengthen Fill, Stabilize & Test timers until CgK value is acceptable to the Quality and Manufacturing teams.
Preventing unauthorized parameter changes requires more than a password.
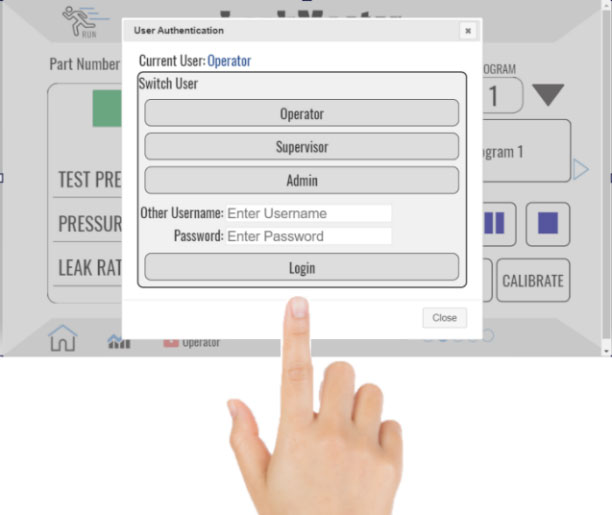
There is no doubt about it. If you want to keep your process safe from unauthorized parameter changes, you should utilize a password along with a unique pin #, but there are other less obvious ways to keep your process parameters safe.
For example:
- Use Slave mode (available on the UltraFlow V3 and Defender Series leak testers). This powerful feature allows the machine PLC control system to send all the leak testing parameters to the leak tester. This prevents operators from making any unwanted changes as the parameters are being sent directly from the PLC.
- Use an electronic pressure regulator rather than a manually adjusted regulator. Manual regulators are prone to adjustments by unauthorized operators or other personnel. By simply using an internal electronic regulator (which is password protected) unauthorized pressure-changes are eliminated.
- Limit physical access to the leak tester.
- Perform an occlusion test in conjunction with the leak test program to ensure a part is connected and the leak test process is not being bypassed (available on the Defender Series, 700 Series or UltraFlow V3).
In addition to a user defined password, simple precautions like these will significantly lower the risk of unauthorized changes or bypassing a leak test process.